Task 1: Downloading and Configuring AWS CLI
1: Download and install AWS CLI using the below link.
https://docs.aws.amazon.com/cli/latest/userguide/getting-started-install.html
2. Open cmd and verify your installation by writing aws in cmd.

3. For general use, enter aws configure command
It is the fastest way to set up your AWS CLI installation.
Now, AWS CLI require four pieces of information:
- Access key ID
- Secret access key
- AWS Region
- Output format
Give the detail step by step as shown below.

4. Now, go to your C drive then user then select the user.
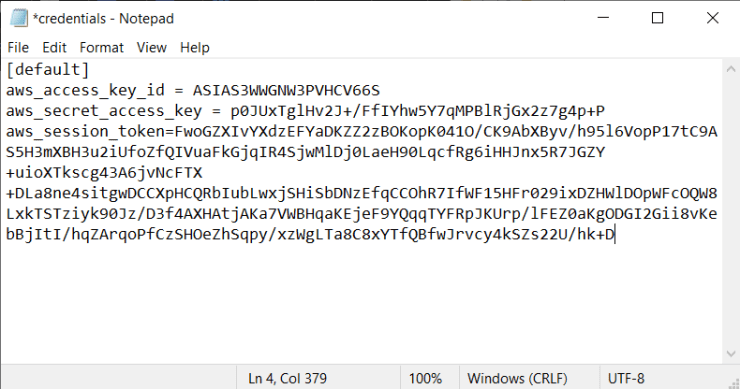
5. in the respective user, there is a folder .aws open that and then open credentials in notepad.
6. In credentials file paste aws_secret_access_key below aws_access_key_id.

Task 2: Creating VPC
Now again come back to cmd and write the following command to create VPC.
Keep a note of VPC ID to use in the further resources.
aws ec2 create-vpc --cidr-block 10.0.0.0/24 --tag-specification ResourceType=vpc,Tags=[{Key=Name,Value=DemoVP}]
Task 3: Creating Subnet
Write the following command to create Subnet.
During creating the subnet, you need to give the vpc id that you have copied after craeting the VPC.
aws ec2 create-subnet --vpc-id vpc-03cdbb4c9d94dd4ef --availability-zone ap-south-1a --cidr-block 10.0.0.0/24 --tag-specification ResourceType=subnet,Tags=[{Key=Name,Value=DemoSubnet}]
Task 4: Creating Internet Gateway
Write the following command to create Internet Gateway.
Keep a note of InternetGatewayId to use in the further resources.
aws ec2 create-internet-gateway --tag-specification ResourceType=internet-gateway,Tags=[{Key=Name,Value=DemoIG}]
Task 5: Attaching Internet Gateway to VPC.
Write the following command to attach the Internet Gateway to the VPC.
Here, specify the VPC Id and InternetGatewayId which you want to attach.
aws ec2 attach-internet-gateway --vpc-id vpc-03cdbb4c9d94dd4ef --internet-gateway-id igw-0e54cd9c0c5f82b3b
Task 6: Creating Route Table.
Write the following command to create route table.
Keep a note of RouteTableId to use in the further resources.
aws ec2 create-route-table --vpc-id vpc-03cdbb4c9d94dd4ef
Task 7: Editing Routes in Route Table.
Write the following command to edit routes in route table.
Here use the RouteTableId and InternetGatewayId.
aws ec2 create-route --route-table-id rtb-04757b7d540bb8dbd --destination-cidr-block 0.0.0.0/0 --gateway-id igw-0e54cd9c0c5f82b3b
Task 8: Adding Associates in Route Table.
Write the following command to add associates routes in route table.
Here use the SubnetId and RouteTableId
aws ec2 associate-route-table --subnet-id subnet-07906d3a8c0fa351b --route-table-id rtb-04757b7d540bb8dbd
Task 9: Creating Security Group
Write the following command to create security group.
Keep a note of SecurityGroupId to use in the further resources.
aws ec2 create-security-group --group-name DemoSecurityGroup --description DemoSecurityGroup --vpc-id vpc-03cdbb4c9d94dd4ef
Task 10: Adding Inbond Rules Security Group
Write the following commands to add Inbond rule in security group.
aws ec2 authorize-security-group-ingress --group-id sg-088babff9deb4d3dc --protocol tcp --port 22 --cidr 0.0.0.0/0aws ec2 authorize-security-group-ingress --group-id sg-088babff9deb4d3dc --protocol tcp --port 3389 --cidr 0.0.0.0/0aws ec2 authorize-security-group-ingress --group-id sg-088babff9deb4d3dc --protocol tcp --port 80 --cidr 0.0.0.0/0aws ec2 authorize-security-group-ingress --group-id sg-088babff9deb4d3dc --protocol tcp --port 443 --cidr 0.0.0.0/0

Task 10: Creating Key Value
Write the following commands to create key value.
The key will automatically downloaded in perticual user folder.
aws ec2 create-key-pair --key-name Demo --output text>Demo.pem
Task 11: Launching Amazon Linux EC2 Instance
Write the following commands to Launch Amazon Linux EC2 Instance.
To launch amazon linux Instance provide image id : ami-0e6329e222e662a52
Provide the key name, SecurityGroupId, SubnetId.
aws ec2 run-instances --image-id ami-0e6329e222e662a52 --count 1 --instance-type t2.micro --key-name Demo --security-group-id sg-088babff9deb4d3dc --subnet-id subnet-07906d3a8c0fa351b --associate-public-ip-address
Task 12: Launching Windows EC2 Instance.
Write the following commands to launch windows EC2 instance.
To launch Windows Instance provide image id : ami-072b0ca48713abe5a
Provide the key name, SecurityGroupId, SubnetId.
aws ec2 run-instances --image-id ami-072b0ca48713abe5a --count 1 --instance-type t2.micro --key-name Demo --security-group-id sg-088babff9deb4d3dc --subnet-id subnet-07906d3a8c0fa351b --associate-public-ip-address
Task 13: Connecting Amazon Linux Instance to ssh client.
Write the following commands to connect the instance with ssh client.
Provide the key name, Public ip.
ssh -i "Demo.pem" ec2-user@13.126.225.125
Tags: L2DLearn2Done