Step 1: Create one VPC.
Step 2: Create 2 Subnets.
Step 3: Create Internet Gateway and attach to VPC.
Step 4: Create Route Table, attach both subnets.
Step 5: Create Security Group and give the below port for Linux.
- SSH
- HTTP
- HTTPS
Step 6: Create Key Pair.
Step 7: Create 2 EC2 Instances of Linux and and paste the following code in each instance in user data under Advance.
Instance 1:
#!/bin/bash
sudo yum install httpd -y
sudo systemctl start httpd
sudo chmod 777 /var/www/html
echo "<h1>Primary Server $(hostname -f)</h1>" > /var/www/html/index.html
Instance 2:
#!/bin/bash
sudo yum install httpd -y
sudo systemctl start httpd
sudo chmod 777 /var/www/html
echo "<h1>Secondary Server $(hostname -f)</h1>" > /var/www/html/index.html
Step 8: Allocate 2 Elastic IP and associate to each instance.
Step 9: Configure an Amazon Route 53 Health Check.
1. In AWS Management Console, from the Services menu, choose Route 53.

2. In the left navigation pane, click Health checks and then click on Create heath check button.

3. Configure the following, leaving all other fields with their default values:
- Name: Primary-Website-Health
- What to monitor: Endpoint
- Specify endpoint by: IP address
Paste in the IPv4 Public IP Address of Instance1. You can find this value in the EC2 Console, or alternatively, choose Show from the Details menu above these instructions, and copy the Instance1PublicIP value.

4. Now, click on Next button

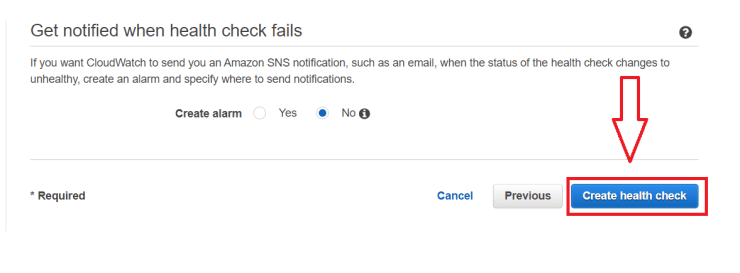
5. Finally, click on Create heah button. Here, you can also create alarm to get notified when your heath check changes to unhealthy.

5. The health check may take up to a minute to show a “Healthy” status. Click the refresh icon to update your view of the current status.

Step 10: Configure Amazon Route 53 Record Sets.
1. Back in the Route 53 console, in the left navigation pane, click Hosted zones.
2. Click on Click hosted zone

3. Write your Domain name leaving all the settings default and then click on Create hosted zone button.


4. Copy all the 4 nameservers and make changes in DNS of the domain from where you have purchased the domain.

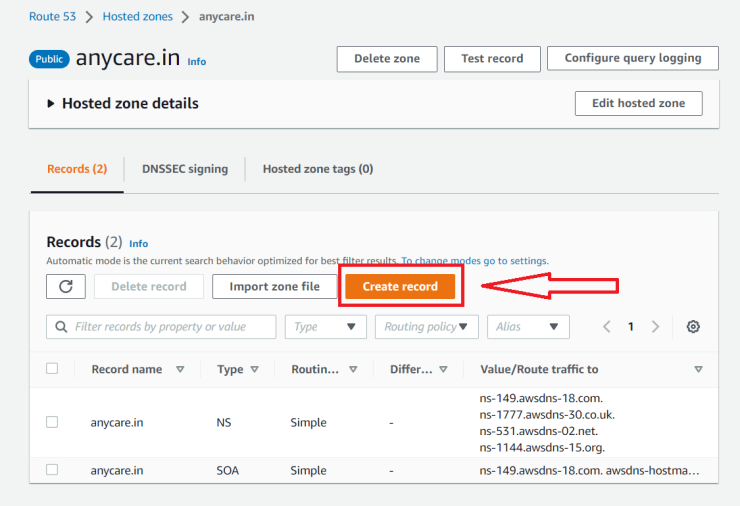
5. Now, we have to create a record so click on Create record button.

6. Configure the following options for record 1:
- Record name: www
- Record type: A – Routes traffic to an IPv4 address and some AWS resources
- Value: In the text box that appears, enter the IP address for the Instance1.
- TTL (seconds): 15
- Routing policy: Failover
- Failover record type: Primary
- Health check: Primary-Website-Health
- Record ID: 1

7. Click on Add another record button to create another record.

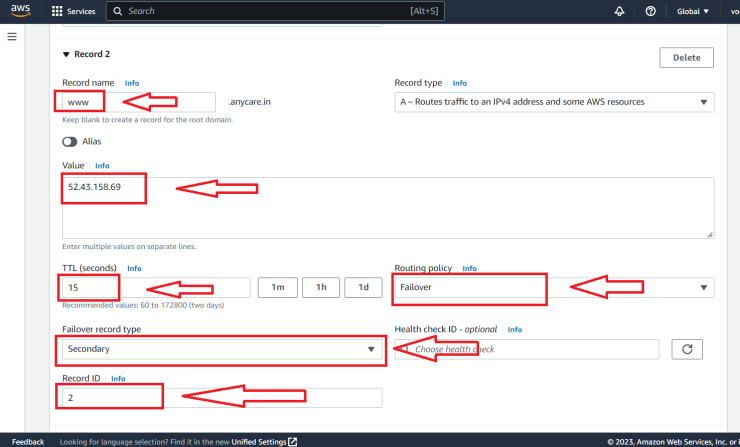
8. Configure the following options for record 2:
- Record name: www
- Record type: A – Routes traffic to an IPv4 address and some AWS resources
- Value: In the text box that appears, enter the IP address for the Instance2.
- TTL (seconds): 15
- Routing policy: Failover
- Failover record type: Secondary
- Health check: Leave this empty
- Record ID: 2

9. Finally, click on Create record button.

Step 11: Verify the Failover Functionality
1. Return to the AWS Management Console. On the Services menu, click EC2 and then choose Instances.
2. Check the box, next to Instance1.
3. From the Instance state menu click Stop instance. Then, if prompted, click Yes, Stop.
The primary website will now stop functioning. The Route 53 health check you configured will notice that the application is not responding, and the record set entries you configured will cause DNS traffic to failover to the secondary EC2 instance.
4. On the Services menu, click Route 53.
5. In the left navigation pane, click Health checks.
6. Select Primary-Website-Health, and in the lower pane, click Monitoring.
You will see failed health checks within minutes of stopping the EC2 instance.
7. Wait until the status of Primary-Website-Health is Unhealthy. If necessary, periodically click refresh. This may take a few minutes.
8. Return to the browser tab where you have the anycare.in website open and refresh the page.
Notice that the Region/Availability Zone value now displays a different Availability Zone (for example, eu-west-2b instead of eu-west-2a). You are now seeing the website served from your Instance2 instance.
If you do not get the correct results, re-confirm that Primary-Website-Health has registered as Unhealthy and then try again. It may take a minute or two for DNS changes to propagate.
You have now successfully confirmed that your application environment can failover from its primary Availability Zone to its secondary Availability Zone if the server in the primary fails.
